Programmation des robots Poppy en Python
Ce chapitre vous guidera de manière à pouvoir contrôler les robots Poppy en Python. Comme c'est le langage actuel pour écrire des librairies Poppy, vous verrez comment accéder tous les différents niveaux de contrôle, du plus haut vers le plus bas.
Nous allons détailler tout ce que vous devez savoir pour pouvoir programmer directement le robot en utilisant le Python embarqué dans le robot Poppy ou pour l'installer localement. Remarquez que ce chapitre ne prétend pas vous apprendre le langage Python ou la programmation à partir de zéro et donc si vous êtes totalement nouveau sur le langage Python, il peut être bon de commencer avec un tutoriel de Python. Pourtant, nous essayons de garder les tutoriels aussi simples que possible et nous vous avertirons toujours lorsque certaines parties ciblent les utilisateurs les plus avancés.
Nous allons essayer de fournir autant d'exemples que possible et de l'axer sur l’API complète ainsi vous pouvez trouver et utiliser les fonctionnalités moins courantes. La plupart des exemples et didacticiels sont disponibles comme une liste de notebooks Jupyter. Le prochain chapitre, Galerie de notebooks Jupyter, présente une liste descriptive de chaque notebook, de ce qu'ils contiennent, comment ils peuvent être utilisés, pour quel robot, etc.
Toutes les bibliothèques Poppy sont open source et sont distribués sous la licence GPL v3. Ainsi, vous pouvez accéder librement le code source sur GitHub. N’hésitez pas à créer un fork, envoyer un pull/request et à contribuer !
Pourquoi Python?
Les bibliothèques développées pour le projet Poppy ont été conçus dans le but de rendre facile et rapide l’écriture du code de contrôle des différents robots basés sur - à l'origine - les servomoteurs dynamixel robotis. L’idée était de fournir un accès depuis le bas niveau -communication série brute avec un moteur spécifique par exemple- à des niveaux plus élevés tels que le démarrage et l’arrêt de primitives/comportements (p. ex. suivi de visage, postures,...) ou l'enregistrement directement des mouvements grâce à de l’apprentissage par démonstration.
Nous avons décidé d’écrire la plupart d'entre eux en Python, car sa souplesse permet un développement rapide et modulaire. Elles étaient également destiné à être accessible par un large public, de développeurs, de roboticiens en général, pour des amateurs, des chercheurs, des artistes... Python a également été choisi pour l'énorme choix de bibliothèques existantes (scientifique, vision par ordinateur, web...), donc si quelqu'un souhaite ajouter un nouvel élément, comme le support à un nouveau moteur/capteur, cela devrait être réalisable le plus facilement et rapidement possible.
Enfin, le support multiplateforme et la facilité d’installation étaient également des aspects essentiels.
Vue d’ensemble des différentes bibliothèques
Une documentation plus détaillée de ces bibliothèques logicielles est disponible dans la section bibliothèques logicielles
Avant de se lancer dans la programmation, nous allons présenter brièvement les différentes bibliothèques Poppy existantes et comment elles interagissent entre elles.
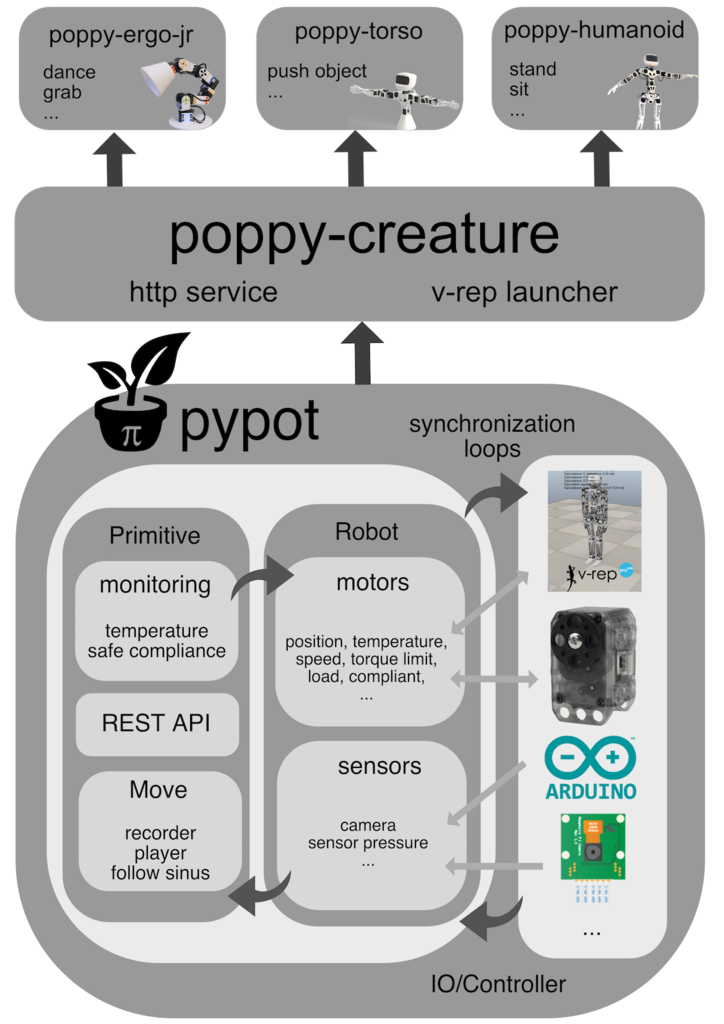
Il y a trois principales bibliothèques logicielles :
pypot : C’est le cœur de l’architecture logicielle Poppy. Pypot gère toutes les communications de bas niveau avec le matériel (capteurs et moteurs), définit les boucles de synchronisation afin que votre commande soient toujours à jour. Il fournit également les primitives du mécanisme qui permet la définition d’un comportement simple qui peut être -plus ou moins- automatiquement combinés.
poppy-ergo-jr, poppy-torso, and poppy-humanoid: ces bibliothèques sont spécifiques à chaque robot Poppy. Elles définissent la configuration particulière du robot, les capteurs utilisés, quels moteurs sont connectés à quel bus... C’est aussi ici que des comportements spécifiques à une créature sont définis (la primitive qui fait Poppy Humanoid se tenir debout par exemple).
Cela est résumé dans le schéma ci-dessous :
Installation
Tout d’abord, notez que si vous n’envisagez d’utiliser que des robots réels, ils viennent avec Python et toutes les bibliothèques Poppy déjà installées. Vous pouvez vous connecter directement au serveur Jupyter Notebook via l'interface web et n’avez rien à installer sur votre machine !
Ce que vous devez installer est résumé dans le schéma ci-dessous :
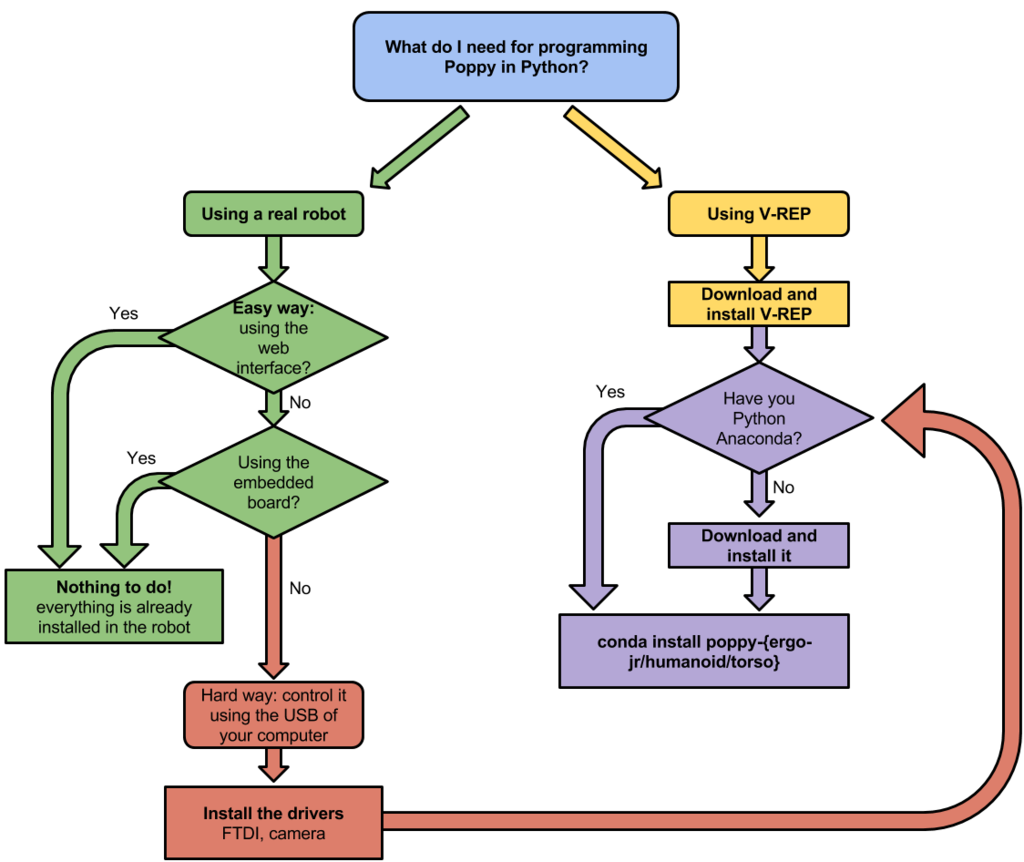
Ainsi, si vous prévoyez de soit
- Utiliser un simulateur (p. ex. CoppeliaSim ou simulateur web),
- ou de brancher le robot à votre ordinateur
Vous devrez installer les bibliothèques Poppy localement. Elles fonctionnent sur Windows, Mac OSX, Linux et ont été testées sur Python >= 3.5
Si vous planifiez de brancher votre robot directement suir votre port USB, des pilotes additionnelles devront être installés.
Les étapes sont détaillées dans ce chapitre.
Pour démarrer : Bonjour Poppy !
Afin de vous donner une vue d'ensemble de ce que vous pouvez faire avec Poppy et Python, cette section va vous montrer comment :
- Crer et connecter votre robot
- Consulter les valeurs renvoyées par les capteurs et les moteurs
- Utiliser les primitives en enregistrant des mouvements
Cette section ne prétend pas tout couvrir ce qui est possible mais vous donne un bon bagage de départ. Pour un usage avancé, la section suivante vous présente des cahiers Jupyter Notebook à suivre.
Dans ces exemples, nous supposons que vous disposez d'un environnement fonctionnel, càd que vous avez soit :
- un robot branché avec sa Raspberry Pi : vous utiliser sont interpréteur Python préinstallé via le Jupyter Notebook
- installé les bibliothèques logicielles de votre créature sur votre ordinateur pour utiliser le simulateur
- installé les bibliothèques logicielles de votre créature sur votre ordinateur pour utiliser le robot branché en USB
Créer et se connecter au robot
Importer la bilbiothèque
La toute première étape est d'importer la bilbiothèque. Dans Python elles s'appellent des modules ou packages.
Pour ce faire, la syntaxe est la suivante:
from pypot.creatures import *
L'étoile signifie "tout", ce qui veut dire que nous allons importer toutes les créatures Poppy installées sur votre ordinateur. Mais il est possible d'en improter qu'une seule ...
... par exemple celle de l'Ergo Jr :
from pypot.creatures import PoppyErgoJr
... par exemple celle de Torso :
from pypot.creatures import PoppyTorso
... par exemple celle d'Humanoid :
from pypot.creatures import PoppyHumanoid
Si une erreur similaire à cette capture d'écran apparaît (erreur nommée
Import Error), alors votre installation des bibliothèque Python a probablement échoué. Reportez-vous à la section d'installation pour recommencer.
In [1]: from pypot.creatures import PoppyHumanoid
ImportError Traceback (most recent call last)
<ipython-input-1-18e4c5a36525> in <module>()
----> 1 from pypot.creatures import PoppyHumanoid

ImportError: cannot import name PoppyHumanoid
Créer l'objet "Robot" (avec un robot réel)
L'objet Robot est celui qui représente votre robot en Pyton. Selon votre créature, vous devez créer un objet différent ...
... pour importer l'objet de l'Ergo Jr :
poppy = PoppyErgoJr()
... pour importer l'objet de Torso :
poppy = PoppyTorso()
... pour importer l'objet de l'Humanoid :
# if you are using a Humanoid
poppy = PoppyHumanoid()
Si aucune erreur n'apparaît, alors votre interpréteur Python est correctement connecté. En revanche si une erreur similaire à ceci apparait, alors certains de vos moteurs (voire tous) sont peut-être mal connectés ou défecteueux. Vérifiez leur connectique et le schéma de montage.
Note Lorsqu'elle survient, cette erreur vous indiquer le numéro du ou des moteur(s) posant problème entre les crochets, cela peut vous aider à situer la source du problème.
IOError: Connection to the robot failed! No suitable port found for ids [3, 5, 7, 11, 13, 17]. These ids are missing [3, 5, 7, 11, 13, 17] !
Créer l'objet Robot - avec CoppeliaSim (V-REP)
To use a simulated robot instead of a real one, you only have to specify it when creating the Robot object. For instance, if you want to create a simulated Poppy Torso, you simply have to execute the following line:
poppy = PoppyTorso(simulator='vrep')
All three Poppy robots - Humanoid, Torso, and Ergo Jr - can be used with CoppeliaSim.
If you see an error message like this, check that you have launched CoppeliaSim and that you have close the popup in CoppeliaSim (see this chapter for details).
IOError: Connection to CoppeliaSim failed!
Create the Robot object - with web simulator
Currently only the Ergo Jr is usable within the web simulator. It also requires specific versions of libraries to be used properly.
To make sure you meet these requirements, you can type this command from your shell:
pip install pypot>=2.12 poppy-creature>=1.8 poppy-ergo-jr>=1.6 --upgrade
Vous pouvez ensuite instancier la créature poppy-ergo-jr :
poppy-services --poppy-simu --snap --no-browser poppy-ergo-jr
Cela va créer un serveur pour Snap ! sur port 6969 et un serveur pour le visualiseur sur le port 8080.
Vous pouvez ensuite vous diriger vers la page du visualiseur.
Accéder aux capteurs et aux moteurs
L’objet robot que vous venez de créer contient deux groupes principaux d’objets :
- moteurs
- sensors
auxquelles on peut facilement accéder à l’aide de poppy.motors et poppy.sensors. Dès que l’objet robot est créé, il débute automatiquement des boucles de synchronisation qui assurerons que les dernières valeurs disponibles sont reçus/envoyés au robot.
Les servomoteurs qui sont utilisés dans des robots Poppy peuvent être considérés à la fois comme des moteurs ou des capteurs. Indeed, on top of being "simple" motors, they also provide multiple sensing information: their current position, speed and load but also their temperature, the current used... Yet, for simplification they are only available under the motor category.
Get data from your robot
Now that you have created your robot object, you can directly use Python to discover which motors are attached.
In all examples below the results are shown for an ErgoJr. If you are using a Torso or a Humanoid you will see more motors with different names.
For instance, to know how many motors your robot have you can execute:
print(len(poppy.motors))
poppy.motors is actually a list of all motors connected to your robot. Thus, if you want to get the present position of all motors, you can do:
for m in poppy.motors:
    print(m.present_position)
Of course, you can also access a specific motor. To do that, you need to know the name for the motor you want to access. You can find this list in the assembly documentation of your robot.
You can also get a list of all motors name directly from python:
for m in poppy.motors:
    print(m.name)
or using a motor pythonic expression:
print([m.name for m in poppy.motors])
Then you can directly access the desired motor by its name:
m = poppy.m3
or get its position:
print(poppy.m3.present_position)
The most common values for motors are: present_position present_speed * present_load
Similarly, you can get data from your sensors. Depending on the Poppy robot you have different sensors available. You can get the list of all sensors in the exact same way you did for motors:
print([s.name for s in poppy.sensors])
And then access a specific sensors by its name. For instance, to get an image from the camera of the Ergo Jr:
img = poppy.camera.frame
This section just presented some of the available values that you can get from your motors/sensors. They are many other - some are specific to a particular robot - we will present them through the different notebooks.
Send motor commands
Now that we have shown you how to read values from your robot, it is time to learn how to make it move!
This is actually really similar to what you have just seen. Instead of getting the present_position of a motor you simply have to set its goal_position.
But first, you have to make sure your motor is stiff, meaning that you cannot move it by hand. To do that we will turn off its compliancy. Assuming you have an Ergo Jr and want to make the motor m3 moves - feel free to use any other motor but make sure the motor can freely move without hurting any of your finger:
poppy.m3.compliant = False
The motor should now be stiff. And then, to make it move to its zero position:
poppy.m3.goal_position = 0
Note: present_position and goal_position are actually two different registers. The first refers to the current position of the motor (read only) while the second corresponds to the target position you want your robot to reach. Thus, they can have different values while the motor is still moving to reach its goal_position.
As a slightly more complex example we will make it go to 30 degrees then -30° three times:
import time

for _ in range(3):
    poppy.m3.goal_position = 30
    time.sleep(0.5)
    poppy.m3.goal_position = -30
    time.sleep(0.5)
Note that after each new value set to goal_position we wait so the motor has enough time to actually reach this new position. Another way to do the same thing is to use the goto_position method:
import time

for _ in range(3):
    poppy.m3.goto_position(30, 0.5, wait=True)
    poppy.m3.goto_position(-30, 0.5, wait=True)
As you can see, this method takes three arguments, the target position, the duration of the move and whether to wait or not the end of the motion.
If you want to move multiple motors at the same time, you can simply do something like:
for _ in range(3):
    poppy.m1.goal_position = -20
    poppy.m3.goal_position = 30
    time.sleep(0.5)
    poppy.m1.goal_position = 20
    poppy.m3.goal_position = -30
    time.sleep(0.5)
or use a python dictionary storing the target position per motor you want to move, that can be given to the goto_position method:
pos_1 = {'m1': -20, 'm3': 30}
pos_2 = {'m1': 20, 'm3': -30}

for _ in range(3):
    poppy.goto_position(pos_1, 0.5, wait=True)
    poppy.goto_position(pos_2, 0.5, wait=True)
You can turn a motor back to its compliant mode (where you can freely move it) by setting its compliant register to True:
poppy.m3.compliant = True
Record and play motion by demonstration using primitives
Pypot provides you with the primitive mechanism, which are simply pre-defined behaviors that can be attached to your robot. In this section, we will show you how to use some primitives already existing for recording and playing motions. You can also define your own primitive but this is out of the scope of this section, you will find details on how to do this in dedicated notebooks.
Record a motion by demonstration
Designing choreographies for your robot using goal_position or goto_position can be long and kind of troublesome. Fortunately, there is a much more efficient way of doing this: recording motions by directly demonstrating the move on the robot.
This can be summarized into few steps:
- make the robot compliant so you can move it by hand
- start the recording
- actually moves the robot so it follows whatever move/choreography you can think of
- stop the recording
And now to do that in Python:
So, first we turn all motors of the robot compliants:
for m in poppy.motors:
    m.compliant = True
You can also record a movement with motors stiff (
compliant = False), and moving them with goal_position or goto_position commands.
Then, we have to include the primitive used for recording motion:
from pypot.primitive.move import MoveRecorder
To create this primitive, you have to give the following arguments:
on which robot you want to use this primitive (this can be useful if you are working with multiple robot at a time - for instance you can record a move on a robot and at the same time make it reproduce by another one.
the record frequency of the move you want to register: how many position per second will be recorded - the higher the more accurate the record will be but also more data will have to be processed - good values are usually between 10Hz and 50Hz.
the motors that you want to record. you can record a move on a subpart of you robot, for instance only on the left arm.
Here, we will record a move on the whole robot at 50Hz:
record = MoveRecorder(poppy, 50, poppy.motors)
We used poppy.motors to specify that we want all motors if you only want let's say the two first motors of an Ergo Jr you could have used [poppy.m1, poppy.m2] instead.
Now it is time to record. As it can be hard to both move the robot and type Python command at the same time, we will make a small script, that:
- wait 5s so you can get ready to record
- start the record
- record for 10 seconds
- stop the records
import time

# Give you time to get ready
print('Get ready to record a move...')
time.sleep(5)

# Start the record
record.start()
print('Now recording !')

# Wait for 10s so you can record what you want
time.sleep(10)

# Stop the record
print('The record is over!')
record.stop()
Now, you should have a move recorded. You can retrieve it from the recorder primitive:
my_recorded_move = record.move
and check how many positions where recorded:
print(len(my_recorded_move.positions()))
Replay recorded moves
Now to play back recorded motions you have to use another primitive: MovePlayer
from pypot.primitive.move import MovePlayer

player = MovePlayer(poppy, my_recorded_move)
As you can see, to create it you have to specify the robot (as for the MoveRecorder) and the move you want to play.
Automatically all recorded motors become stiff to be able to play the move.
Then, you can simply start the replay:
player.start()
And if you want to play it three times in a row:
for _ in range(3):
    player.start()
    player.wait_to_stop()
We use the wait_to_stop method to make sure we wait for the first move to finish before we start another. By default, playing a move we will not block to allow you to play multiple move in parallel.
Write a simple sensori-motor loop
Robotic is all about sensori-motor loops, meaning that motor commands will be more or less directly related to the sensor readings. In other terms the robot actions will be determined by what it perceives from its environment.
Poppy libraries and more particularly pypot provides you with tools to easily write sensori-motor loops. We will show here a very simple example where some motor of an Ergo Jr will be controlled by the position of other motors in order to keep the head of the Ergo Jr straight.
To do that, we will free the two first motors, so they can be moved by hand. Two other motors will try to lively compensate the motion applied on the free motors.
We need few simple steps:
- read values from sensors (here the two free motors)
- compute command from those readings
- set new motor command
- go back to step 1.
This example is designed for the Ergo Jr. It could be adapted to other Poppy robots, by changing the motors used. Yet, it is not that obvious which one to use to have a "cool" result.
Demo version
Before writing the sensori-motor loop, we will first set the Ergo Jr in a base position.
from pypot.creatures import PoppyErgoJr

jr = PoppyErgoJr()

jr.goto_position({'m1': 0.,
                  'm2': -60.,
                  'm3': 55.,
                  'm4': 0.,
                  'm5': -55.,
                  'm6': 60.}, 2., wait=True)
Then, we make sure the moving speed of the motors are not too high to prevent shaky motions:
for m in jr.motors:
    m.moving_speed = 250
Finally, we free the two first motors:
jr.m1.compliant = True
jr.m2.compliant = True
Now, that everything is setup we write our very simple sensori-motor loop like this:
import time

while True:
    # Step 1
    p1 = jr.m1.present_position
    p2 = jr.m2.present_position

    # Step 2
    g1 = -p1
    g2 = -p2

    # Step 3
    jr.m4.goal_position = g1
    jr.m6.goal_position = g2

    time.sleep(.02)
- Step 1: As you can see, here our readings step is simply to retrieve the present_position of the motors m1 and m2.
- Step 2: Here, we defined the base position so the motors m1/m4 and m2/m6 are parallel. Thus, to compensate the head position, we simply have to define the new motor goal position as the opposite of the read present position.
- Step 3: We simply set the goal position as the just computed command
Those steps are included inside an infinite loop - with a time.sleep to avoid CPU overhead.
To stop this while True loop, you will have to use the classical Ctrl-c, or use the stop button if you are running it through Jupyter.
Now with a primitive
But what about if you want to make this behavior an independent "brick" that you can start/stop on demand combine with other behaviors. Well, primitives are meant to do just that.
There is two main types of primitive: Primitive and LoopPrimitive. The first one basically gives you access to just a run method where you can do everything you want on a robot. The second one as the name indicates is an infinite loop which calls an update method at a pre-defined frequency. In our case it is the more suited one.
Here is the entire definition of this primitive:
class KeepYourHeadStraight(LoopPrimitive):
    def setup(self):
        for m in self.robot.motors:
            m.compliant = False

        self.robot.goto_position({'m1': 0.,
                                  'm2': -60.,
                                  'm3': 55.,
                                  'm4': 0.,
                                  'm5': -55.,
                                  'm6': 60.}, 2., wait=True)

        for m in self.robot.motors:
            m.moving_speed = 250

        self.robot.m1.compliant = True
        self.robot.m2.compliant = True

    def update(self):
        self.robot.m4.goal_position = -self.robot.m1.present_position
        self.robot.m6.goal_position = -self.robot.m2.present_position
As you can see, there is two main parts. The setup method which defines what needs to be done to prepare the robot before starting the behavior - here simply puts it in its base position and turn on the compliance for the two first motors.
And the update method which will be regularly called: here is where we put the actual code for the sensori-motor loop: reading sensor - computing the new command - and sending the new command to the motors.
Now that we have defined our primitive, we can instantiate it and start it:
# we specify we want the primitive to apply on the jr robot instance
# and that the update method should be called at 50Hz
head_straight = KeepYourHeadStraight(jr, 50.0)

head_straight.start()
You can stop it whenever you want:
head_straight.stop()
And re-starting it again...
head_straight.start()
The huge advantage of using a primitive in this case is that after starting it, you can still easily run any other codes that you want. The primitive starts its own thread and thus runs in background without blocking the execution of the rest of the code.